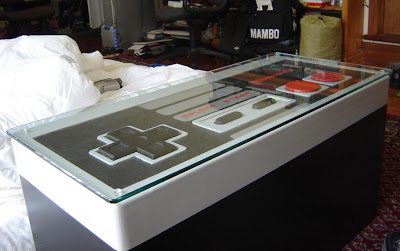
The piece of glass that I had ordered arrived today, it looks super fresh.
Here are the photos of the final thing, with the glass on top:
 You can see I got some tall clear rubber stoppers, which I stuck on the glass, so it doesn't damage the controller when it's sitting on top, and so it clears the height of the buttons:
 And again, here are the pictures of what it looks like finished, without the glass.
 And also again, here's how it opens up, to reveal the storage space inside, which I have already filled.
 Look at the fun-vibes just radiating from Emily's face!:
Some people have asked for the blueprints I used to make it, so they can have a go at making one themselves (yay! I have inspired!).
I didn't really use "blueprints" for this, I basically just stuck my NES controller in a scanner and scanned it. I then printed it off so it filled an A4 page, and used that image to measure how far apart everything on the controller is.
The second half of these blueprints where are just a list of the pieces I needed to cut so I didn't forget.
 One thing to remember if you try this, write a list of all possible tools that you might need.
The hardest tool to find for me was a 90mm Hole saw that I needed to cut the A and B buttons.
Take note that I have literally zero woodwork experience (my school never even had woodwork classes), besides the asteroids cabinet I made. However I did get a lot of advice from my dad and uncle about how I should do stuff (ie. like chiselling out the surface so the hinges sit flush etc.)
If you've just arrived at this post, here are all the previous posts I have posted with all the progress shots as I was making it:
NES coffee table
NES coffee table update 1: Bevelling the edges.
NES coffee table update 2: Making the buttons.
NES coffee table update 3: Making the D-pad.
NES coffee table update 4: Mounting the buttons.
NES coffee table update 5: Painting.
NES coffee table update 6: Wiring and final construction.
Here it is in action! zomg!:


0 comments:
Post a Comment